Windows 11 File Cleanup Guide
Overview
Over time, Windows accumulates temporary files, cached data, and other digital clutter that gradually consumes disk space and can affect system performance. This guide walks you through a structured, safe approach to cleaning up a Windows 11 computer using only Microsoft's built-in tools — no third-party software required.
Third-party cleanup utilities vary widely in quality. Some make aggressive changes with limited benefit, remove files without clear explanation, or introduce their own performance overhead. The built-in Windows tools covered here are predictable, well-documented, and sufficient for most cleanup tasks. This guide is designed for first-time users, with each step explained in plain language.
What This Guide Covers
- Checking free space — knowing your baseline before making any changes
- Disk Cleanup — the classic utility for removing system and user-generated temporary files
- Storage settings — a more granular view of what is consuming disk space
- Storage Sense — automating routine cleanup tasks on a schedule
- Downloads and Recycle Bin — safely clearing commonly overlooked storage
- Advanced cleanup — the Windows Temp folder, for experienced users
- Common mistakes to avoid — what not to do during a cleanup
Before You Start
- Save any open work and close programs you are not actively using
- If your Downloads folder contains important files, review it before starting — do not clear it without checking
- Once the Recycle Bin is emptied, deleted files cannot be recovered through normal means
- Some steps require administrator rights — you may be prompted to confirm
For best results, restart Windows before you begin. A fresh boot releases file locks that might otherwise prevent certain temporary files from being removed, and ensures a more thorough clean.
Step 1: Check Free Space
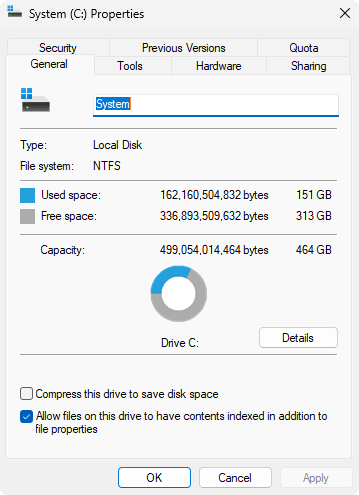
Before making any changes, check how much free space you have. This gives you a baseline so you can see how much space was recovered once you finish. It also helps you assess whether cleanup is urgent or simply routine maintenance.
- Open File Explorer with Windows + E
- Click This PC in the left-hand panel
- Locate Local Disk (C:) under Devices and drives
- Note the free space figure shown beneath the drive icon
A drive with less than 10% free space can noticeably affect system performance — Windows uses free disk space for virtual memory, temporary processing, and software updates. Even if your drive shows plenty of room, accumulated temporary files can cause slower load times and occasional errors, so this cleanup is worthwhile regardless of how much space is shown.
Note the current free space figure before continuing. You can return here after completing the guide to measure how much was recovered.
Step 2: Run Disk Cleanup
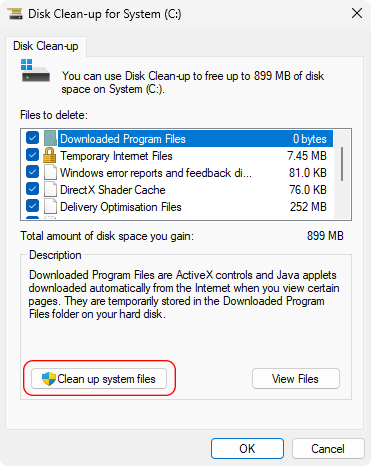
Disk Cleanup is a built-in Windows utility that identifies and removes common categories of unnecessary files — cached thumbnails, system logs, error reports, and leftover update files. It presents a clear checklist so you can choose exactly what to remove and see the total space to be freed before committing.
- Open the Start menu and search for Disk Cleanup
- Select drive C: and click OK
- Wait while Windows calculates how much space can be freed
- Review the category list. Commonly safe selections include: Temporary Internet Files, Temporary Files, Thumbnails, and Delivery Optimisation Files
- For a deeper clean, click Clean up system files — this rescans and adds additional categories, often including Windows Update Cleanup
- When satisfied with your selections, click OK then Delete Files
The total space to be freed is shown at the top of the dialog and updates as you tick or untick categories. Windows Update Cleanup, when available, is often the largest single entry and is safe to remove once the updates have been running stably for a week or two.
Step 3: Remove Temporary Files via Settings
Windows Settings provides a more detailed breakdown of temporary files than Disk Cleanup — particularly useful for identifying large caches and app data that the older utility does not show. This step complements Step 2 rather than replacing it.
- Press Windows + I to open Settings
- Navigate to System → Storage
- Click Temporary files in the storage usage breakdown
- Review the listed categories and tick those you wish to remove
- Click Remove files to confirm
Step 4: Configure Storage Sense
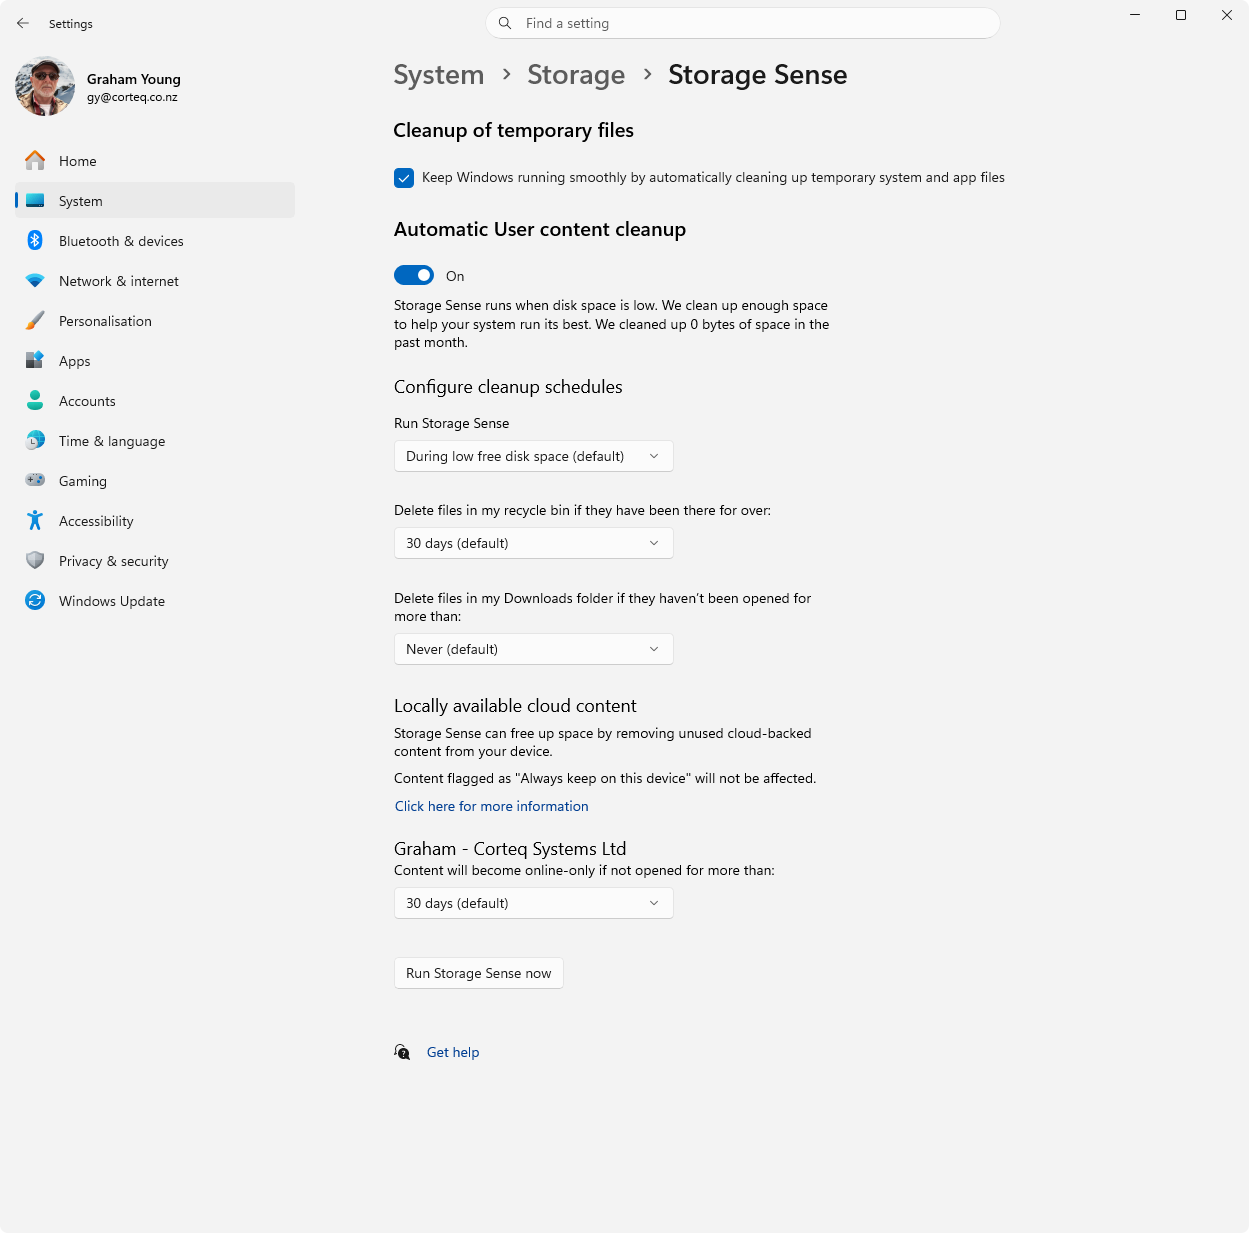
Storage Sense is an automated cleanup feature that runs on a schedule, quietly handling routine maintenance without requiring manual intervention. Once configured, it ensures your system stays tidy over time without you needing to remember to do it.
- Go to Settings → System → Storage
- Toggle Storage Sense to On
- Click the Storage Sense label to open its configuration
- Set your preferred run schedule — monthly is a sensible default for most users
- Optionally configure how long Windows should wait before automatically deleting old items from the Recycle Bin
- Leave the Downloads automatic deletion disabled unless you are confident you consistently move files out of Downloads promptly
Storage Sense only removes files that match your configured rules. It will not delete active documents, photos, or work files. The Downloads automatic deletion feature is off by default and should be used with care — an age threshold of 60 days or more is safer if you do enable it.
Step 5: Review Downloads and Recycle Bin
Downloads Folder
The Downloads folder is one of the most commonly overlooked sources of disk consumption. Installers, large ZIP archives, PDF documents, and media files accumulate here over months and years. Unlike other temporary locations, Windows will never automatically clear Downloads unless you explicitly configure Storage Sense to do so.
Open the folder in File Explorer and sort by Size or Date modified to identify large or old files quickly. Remove anything that is no longer needed. Move documents or files you want to keep into a permanent location — your Documents folder or an organised project folder — rather than using Downloads as long-term storage.
Recycle Bin
When you delete files in Windows, they are moved to the Recycle Bin rather than removed immediately. This acts as a safety net, but disk space is not freed until the Bin is emptied.
Before emptying, open the Recycle Bin and review its contents. If you spot anything deleted by mistake, right-click it and select Restore to return it to its original location. Once you have confirmed there is nothing to recover, right-click the Recycle Bin icon on the desktop and choose Empty Recycle Bin. This step is permanent.
Optional: Advanced Temporary File Cleanup
The steps in this section go beyond the standard built-in tools. They are intended for users who are comfortable navigating Windows system folders and understand that some files will be in use and cannot be removed while the system is running.
Windows Temp Folder
Applications and Windows itself use a dedicated Temp folder to store files during processing. These are supposed to be cleaned up automatically, but leftovers can accumulate over time.
- Press Windows + R to open the Run dialog
- Type temp and press Enter
- Select all files with Ctrl + A and press Delete
- Skip any files that cannot be deleted — these are in use by a running process and should be left alone
Do not delete the Temp folder itself — only its contents. Skipping locked files is expected behaviour and will not cause any problems. Repeating this step after a clean boot (with no other applications running) will allow you to remove more files that were previously locked.
What to Avoid
- Do not manually delete files from Windows, System32, or Program Files — these contain critical operating system and application components
- Do not remove previous Windows installations unless you are certain a rollback will never be needed; once removed, this cannot be undone
- Do not empty Downloads without reviewing its contents — important installers, licenses, and documents are frequently stored here
- Do not use third-party registry cleaners — these rarely provide measurable benefit and can introduce instability or remove legitimate system entries
- Do not force-delete locked files in the Temp folder — skip them and move on
Maintenance Checklist
Run through this checklist for routine disk maintenance — once a month is a reasonable frequency for most users:
- Check available disk space in File Explorer
- Run Disk Cleanup, including system files
- Remove temporary files via Settings → Storage
- Confirm Storage Sense is enabled and configured
- Review and clear the Downloads folder
- Review and empty the Recycle Bin